Quantcast
Channel: Tutorials – Official Blog – Contabo.com
Viewing all 66 articles
Browse latest View live

Flash movie: GIGA Customer Control Panel

$
0
0

You might have already recognized it:

On our international website Giga-International.com we recently added a flash teaser presenting the powerful functions and the easy handling of our new Customer Control Panel.
This Customer Control Panel (CCP) has been released at the 10th of May for all of our international customers.
It makes it possible for every customer to

  • view all your services
  • perform hard reboots anytime you want,
  • perform reinstalls or boot a rescue system anytime you want,
  • update all your contact details,
  • view your payment history as well as previous invoices and to
  • send new PayPal and Moneybookers transfers in a comfortable way.

Anything one can do in the customer control panel is free!

Please click here to watch our new flash teaser that demonstrates how easy it is to manage your server at Giga-International.com:

Flash Teaser (Adobe Flash Plugin required)


From Squeeze to Wheezy like a breeze!!!

$
0
0

Upgrading Debian 6.0 to 7.0


With the release of Debian 7.0 there are two ways that you can have this distribution installed on your VPS or Dedicated servers.

One is, clean installation, this could be done using our customer control panel. This is complete re-installation, so you will loose all your data. This method is recommended as it will freshly install a clean distribution.

But, if your system is not that critical, or if you have somehow a 'clean' system, which means that - you have installed software only using package management tools, you have not manually 'tweaked' anything or if you have not installed any additional software using .tar, then, you can follow the following instructions to upgrade from Debian 6.0 (Squeeze) to Debian 7.0 (Wheeze).

Before we begin, a word of caution :  Though we have tested this on a test server here at our Contabo labs, and everything seem to work without any problem, we highly recommend you to take a backup and store it remotely before you begin, just in case.

Complete official instruction to upgrade could be found here.

Bringing your current Debian 6 up-to-date:

Before beginning it is a good idea to make sure your current release is up to date. you can do it using the following commands:

Update and Upgrade

apt-get update

apt-get upgrade

Changing sources.list

Please open your favorite text editor to open /etc/apt/sources.list file

vi /etc/apt/sources.list

and change squeeze to wheezy, after the change my /etc/apt/sources.list file looks like this :

deb http://ftp.de.debian.org/debian wheezy main non-free contrib
deb-src http://ftp.de.debian.org/debian wheezy main non-free contrib
deb http://security.debian.org/ wheezy/updates main contrib non-free
deb-src http://security.debian.org/ wheezy/updates main contrib non-free
deb http://ftp.de.debian.org/debian wheezy-updates main contrib non-free
deb-src http://ftp.de.debian.org/debian wheezy-updates main contrib non-free


Upgrade the System

We follow the upgrade process in the following sequence according to the official how-to.

Update the sources

apt-get update


Minimal upgrade

apt-get upgrade

Upgrade the kernel
You can check the current installed version of your kernel using the following command :

dpkg -l | grep linux-image

my output was:

ii  linux-image-2.6-amd64                2.6.32+29                      Linux 2.6 for 64-bit PCs (meta-package)
ii  linux-image-2.6.32-5-amd64           2.6.32-45                      Linux 2.6.32 for 64-bit PCs


Upgrading kernel :

apt-get install linux-image-2.6-amd64

next step would be to update grub to be sure that everything works as expected:

update-grub

update udev

apt-get install udev


Final upgrade:

After all the above steps are completed, we can upgrade the distribution:

apt-get dist-upgrade

Here you go – have fun with your new Debian 7.0 you can check your version:

cat /etc/issue

Debian GNU/Linux 7.0 \n \l


Hands on SPDY

$
0
0

What is SPDY?

You can call it as some HTTP(S) Upgrade. With SPDY the web is becoming faster and even more secure. SPDY works completely encrypted with SSL.

What is the goal of SPDY?

Simple as that: For faster and more secure website-loading.

So, what do I need for using SPDY?

  • A VPS or Dedicated Server with Linux (we will use the latest Ubuntu)
  • A website
  • Apache or Nginx (we will use Nginx)
  • An SSL certificate (for testing purpose, can also be self-signed)
  • Some basic linux knowledge

Implementations

There are lots of existing implementations:

  • There is an Apache Module (mod_spdy)
  • There is a Nginx Module
  • Even a Node.js implementation exists, which is super cool, since you are able to make use of the Push streams, a bit like the Websocket things - would be interesting to see some benchmarks on them both

Which browsers support SPDY?

  • Chrome, which was the very first that supported SPDY
  • Firefox, since version 11 / 13
  • Opera, since 12.10

Is my browser already speaking SPDY?

-> https://ist-spdy-aktiviert.de/
-> https://isspdyenabled.com/

How to install SPDY on the mention VPS or server?

Before we begin, a word of caution: Though we have tested this on two servers here at our Contabo labs, and everything seem to work without any problem, we can't take any responsibility on any issues. Even Google marks the whole SPDY as experimental. But it's still something interesting.

A few days/weeks ago, when we tested SPDY, there was no official pre-built debian package for nginx with spdy, so we had to compile it on our own. But that sounds more difficult than it is.
First we install all the building tools (I usually use the package checkinstall, since it is short and requires all the things you need to build): apt-get install checkinstall openssl libssl-dev
wget http://nginx.org/download/nginx-1.4.1.tar.gz # (We've tested this with 1.4.0, due to the security issue with nginx you should use 1.4.1 now. As far as I know there hasn't been changed anything serious)
tar xfz nginx-1.4.1.tar.gz
cd nginx-1.4.1/

Now we need to configure what to build later on. Here we will only do the very basic stuff, and there are _much_ much more possibilities.
./configure --with-http_ssl_module --with-http_spdy_module --conf-path=/etc/nginx/nginx.conf
make #If you have a server with more than one core, specify -j X to increase the building performance
make install

After nginx was successfully installed on the server, we need to create a vhost, this is the config we used for the test:

server {
listen 80;

server_name  spdy.dev;

rewrite     ^(.*)   https://$server_name$1 permanent;
}

server {
listen 443 ssl spdy default_server;

server_name  spdy.dev;

ssl on;
ssl_certificate /etc/nginx/ssl/spdy.crt;
ssl_certificate_key /etc/nginx/ssl/spdy.key;
ssl_protocols SSLv3 TLSv1;
ssl_ciphers ALL:-ADH:+HIGH:+MEDIUM:-LOW:-SSLv2:-EXP;

root /var/www;
}

This has to be between the http {} part, how you do it exactly doesn't matter (include or directly)

Now another important part: We need an SSL certificate. It doesn't really matter if it's self-signed or a paid one.

cd /etc/nginx
mkdir ssl
cd ssl

openssl genrsa -out spdy.key 2048
openssl req -new -key spdy.key -out spdy.csr
openssl x509 -req -days 720 -in spdy.csr -signkey spdy.key -out spdy.crt

We now should have done all the necessary things, so let's start nginx: /usr/local/nginx/sbin/nginx

For verifying if nginx is listening on port 80 and 443, use netstat -tulpen

However, if you have not installed nginx with apt-get, as we have done it, you have to take care that nginx is starting at boot. There are various possibilities to solve this, but this should not be done in this tutorial.

How can I verify if my server is doing SPDY now?
Addon for Chrome and and the addon for Firefox

If you are now really interested in that SPDY stuff, check out the following links:
http://dev.chromium.org/spdy/spdy-whitepaper
http://code.google.com/p/mod-spdy/
https://github.com/indutny/node-spdy

So, after all that - when will you enable SPDY with your website? :)


Rewrite rules with htaccess

$
0
0

Contabo Webspace XXLOne recurring question affects mostly our webspace packages, but should be interesting for many others as well:

How can I move the content of my main domain to a sub-folder without affecting its appearance?


cPanel always assigns one domain as main domain for a user account. Add-On domains can be added easily, but they simply appear as sub-folder in the same folder that is being used by the main domain. Here is the effect:

/

  • public_html/
    • admin/
    • config/
    • data/
    • example2.com/
      • admin/
      • config/
      • data/
      • themes/
      • index.php
    • themes/
    • index.php

This can cause confusion when using several add-on domains. It would be better to have the content of the main domain in a separate sub-folder as well. However, cPanel does not offer a configuration option for this purpose. Luckily, this will not be necessary though, since htaccess rewrites allow specifying the actual location of the website content.

It is best to start with a fresh account. Otherwise, a full backup of all files is as always advisable. The cPanel backup assistant will be helpful here.

The following steps can be done easily via FTP client.

If you are moving an existing website, create a sub-folder in /public_html and name it after the domain, e.g. example.com. Move all content of your main domain to the newly created folder. In our example this would include admin, config, data, themes and index.php. If there already is a .htaccess file, move it as well.

Then create a new .htaccess file in /public_html and paste the following:

RewriteEngine on
RewriteCond %{HTTP_HOST} ^example.com$ [OR]
RewriteCond %{HTTP_HOST} ^www.example.com$
RewriteCond %{REQUEST_URI} !^/example.com
RewriteRule ^(.*)$ example.com/$1 [L]

example.com has to be replaced with your actual domain name.

After saving the file you can open the domain in your browser. The website should be displayed correctly.

The next step depends on the software that is being used on your website. In this example, we show the procedure for Joomla! 3 and WordPress.

Most scripts generate relative URLs based on their location by default. Our changes would cause links on your website to be shown like this:

http://www.example.com/example.com/index.php

To correct this behaviour, the base URL needs to be set statically in the Joomla! configuration. Open configuration.php with an editor and modify the following line:

public $live_site = 'http://www.example.com/';

configuration.php is usually stored read-only. You may need to gain write access first by modifying the file permission.

If you use URL Rewriting in Joomla!, edit the following line in the .htaccess file in the sub-folder of your domain:

RewriteBase /example.com

Make sure to remove the hash at the beginning of the line.

The WordPress configuration is similar. Open wp-config.php with an editor and modify the following lines:

define('WP_HOME','http://example.com');
define('WP_SITEURL','http://example.com');

The changes are not visible to visitors and your website is accessible normally. The new folder structure is much cleaner:

/

  • public_html/
    • example.com/
      • admin/
      • config/
      • data/
      • themes/
      • index.php
    • example2.com/
      • admin/
      • config/
      • data/
      • themes/
      • index.php
    • .htaccess

This is only one of many possibilities of rewrite rules. If you want more information on this complex topic, I can recommend the Apache documentation.


System Rescue CD: First Steps

$
0
0

sysresccd login

Many have already heard about it or even used it once in a while, but most have probably not been introduced to it yet: Our rescue system! While hopefully not being needed often, it provides many possibilities to fix certain problems and to bring the machine back online as soon as possible. When the server is down, every second counts. It is important to know what to do beforehand. Thus, I will provide you with some basic information first:

Our rescue system is based on the SystemRescueCD. This is a specialised Linux distribution for recovery purposes. I can highly recommend it for private usage as well. I always carry a bootable thumb drive with me ;) . The rescue system starts on our servers via PXE network boot. This has several advantages:

  • It is available as long as the server is connected to our network.
  • It is always accessible with the same known login credentials.
  • It boots isolated from the operating system and its settings.

The rescue system can be chosen for Dedicated Servers or VPS's in your Customer Control Panel. After clicking on the rescue icon, a new page opens with a short info text and the version control. The version should match the operating system. This is 64 bit in most cases. Once you click on "Start rescue system", your server will reboot right away.

The system will available after a few minutes via SSH under the server IP and the default port 22. The root password is the default that we have sent you when you ordered the server. We can send you that e-mail again if necessary. We recommend PuTTy (command line) and WinSCP (file transfer) as Windows clients.

You will probably need access to your data. Check first which partitions are available:

fdisk -l

The root file system is usually located on /dev/sda1 or /dev/vda1. Use the following command to mount the according partition:

mount /dev/sda1 /mnt/custom

Your server files are now available in /mnt/custom.

If you use Windows as operating system on your server, our rescue system can be helpful despite the different architecture. The C: drive is usually located on /dev/sda2 or /dev/vda2. The command to mount it with write access is a bit different:

ntfs-3g /dev/sda2 /mnt/windows

You are now set to modify configuration files or to retrieve personal data. WinSCP is perfect for those jobs.

When you have finished your work and want to boot your server normally again, enter the following commands:

exitrescue
reboot

Your server should then boot from the hard disk again and be available as usual.

This was supposed to be a short introduction. Becoming familiar with the Linux shell and its possibilities is very advantageous. I can definitely recommend the tutorials on nixCraft for further reading.

More tutorials for certain procedures will follow, so stay tuned!


Process Controlling With Supervisor

$
0
0

If you run your own virtual or dedicated server, chances are that you want to run a specific program or a number of programs that make up the service you want to use or offer. If the program you want to run is part of the Linux distribution of your choice there usually is not much more to it than installing the package and configuring the program. However, if the program comes from an external source or you are writing it yourself, you need to make sure it is started automatically when the server is booting. Additionally, during development or early testing phases of your own program, there might be errors in the code leading to a crash of your application and you might want to make sure that it gets restarted automatically in such a case. A few years ago, the solution to the first issue was quite simple. All you need to do was to create an init script that will handle the starting and stopping of the server. However, recently many Linux distributions changed the way they handle the boot process. Some are still using init, others may be using upstart or even systemd now. Providing the files necessary for all of this systems can be quite a hassle and while upstart and systemd support restarting programs on unexpected termination, implementing this with init is possible but requires to change init's configuration itself.

For my own needs I have become attached to using supervisor for this task - the program and the documentation can be found on http://supervisord.org, but most Linux distributions provide pre-built packages in their repositories. Supervisor itself is a daemon that is run by the system's process management so it gets run by init or it's counterparts. To run your own program, you have to add it to supervisord's configuration and it will make sure that it gets started on boot and restarted in case it crashes.

As an example, I will be using a very small custom web application written in Python using the bottle framework. Since this article is not about web programming, I am keeping it simple:

1 from bottle import route, run
2
3 @route('/')
4 def index():
5     return 'Hello World'
6
7 run(host='0.0.0.0', port=8080)

All this does is run a webserver on port 8080 and displaying Hello World in your web browser when you navigate to it. If the above code is saved to a file app.py, you can run it using python app.py and it will just run forever (or until it crashes). Now would be a good time to configure supervisor to run this application for us. Supervisor provides a command line tool called supervisorctl to check the status of configured applications and to start or stop them if needed. Running supervisorctl status will show you... nothing, as we did not set up anything yet. We create a new file called hello.conf which will contain everything supervisor needs to know to run our application and place it in /etc/supervisor/conf.d/. The most basic configuration defines a new program to run with a given name and a command to be executed as well as a user name that the program should be run with - if you leave this, your program will run as root which is almost always a bad idea:

[program:hello]
command=/usr/bin/python /home/markus/app.py
user=markus

Note that it is usually a good idea to provide absolute paths in such configurations. After the file has been saved, you can use supervisorctl reread to cause supervisor to reread its configuration file. If everything is right, the output of the command should tell you that a program named hello is now available:

# supervisorctl reread
hello: available

We can now start the program by running

# supervisorctl start hello
hello: started

Check the status again to see if its actually running now:

# supervisorctl status
hello                 RUNNING    pid 32675, uptime 0:00:46

As you can see, it tells us that the program is running, it's PID and the time elapsed since it's start. To simulate a crash, we will forcefully terminate the program and check if supervisor restarts it as expected:

# kill -9 32675
# supervisorctl status
hello                 RUNNING    pid 32686, uptime 0:00:04

The supervisor homepage gives you a lot more information about possible values to configure supervisor itself and the programs it runs. You can even configure the location of log files and automatic rotation for them in case they grow over a given size. More details about this can be found here: http://supervisord.org/configuration.html. Finally, no more reason to run your applications in detached screen sessions... ;)


Adding IPv6 connectivity to your server

$
0
0

With the recent deployment of IPv6 in our data centre network, newly installed servers should be configured with an IPv6 address out of the box. For existing installations that you do not want to reinstall or colocation devices not installed with our operating system deployment solution, the necessary information needs to be added to your system manually. This guide should give you enough information to get IPv6 up and running on your server.

Obtaining the necessary information

We have already assigned an IPv6 address to every one of your services where applicable. You can find this address in your customer control panel, which should look like this:

ipv6ccp

Do not use the address space shown in the image, "2a02:c200:0:10:3:0:7:1". Use your own IPv6 address space from your customer control panel instead.

At this time, the following additional information is valid for every IPv6 enabled server:

netmask / prefix length: 112
gateway address: fe80::1
dns servers: 2a02:c200:0:10::1231:1 and 2a02:c200:0:10::5002:1

Initial configuration (Linux-based operating systems)

Before adding this IPv6 address to your configuration files and thus making the changes persist after a server reboot, you might want to configure it manually. I will use the IPv6 address 2001:db8::1 in this example. Please replace it with the appropriate address assigned to the server in question. If your network card is not eth0, you will have to replace "eth0" with the appropriate value, too.

Add the address to the server's network interface in the format /:

ip addr add 2001:db8::1/112 dev eth0

You can validate that the address has been enabled by running

ip -6 addr show

which should show, among others, the following lines:

2: eth0: <BROADCAST,MULTICAST,UP,LOWER_UP> mtu 1500 qlen 1000
inet6 2001:db8::1/112 scope global valid_lft forever preferred_lft forever

In order to reach the everyone else in the ever growing IPv6 world, add a default route to the server's configuration:

ip route add default via fe80::1 dev eth0

Again, you can verify the setting by running

ip -6 route show

which should show the following output:

default via fe80::1 dev eth0 metric 1024 mtu 1500 advmss 1440 hoplimit 4294967295

You can now check your IPv6 connectivity by using the ping6 command:

ping6 2a02:c200:0:10::5001:1

Making things persist (Linux-based operating systems)

Different operating systems have different ways of setting up the network configuration. If in doubt, please search the documentation for your operating system. Sample configurations for Debian/Ubuntu and CentOS/Fedora/RedHat will be provided here. Please be very careful when applying this changes. Errors may result in your server no longer responding to any network traffic at all!

Debian / Ubuntu

Edit the file /etc/network/interfaces and add the following lines:

iface eth0 inet6 static
address 2001:db8::1
netmask 112
gateway fe80::1
accept_ra 0
autoconf 0
privext 0

CentOS / Fedora / RedHat

Make sure IPv6 networking is enabled at all by editing /etc/sysconfig/network. Add the following line to this file:

NETWORKING_IPV6=yes

Then add the IP configuration to the file /etc/sysconfig/network-scripts/ifcfg-eth0

IPV6INIT=yes
IPV6ADDR=2001:db8::1/112
IPV6_DEFAULTGW=fe80::1
IPV6_DEFAULTDEV=eth0

This should make sure the IPv6 address gets enabled again after your server reboots.

Configuration steps for Windows Server operating systems

After you have connected to your server using RDP, click on "Start" > "Control Panel" > "Network and Internet" > "Network and Sharing Center". Click on "Change Adapter Settings" on the left side of the window. Right-click the icon for the network connection, select "Properties" from the menu:

IPv6-Windows-1

Highlight the entry "Internet Protocol Version 6 (TCP/IP)" on the list, make sure that the checkbox is ticked and click on "Properties" again. Enter the information you gathered from step one as shown below:

IPv6-Windows-2

Click on "OK", to close the dialogs and save the changes.

Still cannot reach your server via IPv6?

If you have made the changes as described above and if the ping6 command did return a response but you nevertheless cannot reach your server via IPv6 from your local computer, chances are that IPv6 might not yet be enabled in your local network. Your local ISP can help in this case.


LAMP made easy

$
0
0

Logo_LAMPWe would like to make you aware of a novelty in our ASI. Some of you may have noticed already that we had implemented some time ago, an additional LINUX option called LAMP

This option is available from our website when ordering a VPS or dedicated server, that runs under either LINUX operating system CentOS, Debian and Ubuntu.

By that additional option, you will - with the aforementioned LINUX distributions - be provided with a complete webserver environment. In addition to the LINUX operating system (L) you will receive an installation of Apache 2(A), MySQL (M), and the commonly known script language PHP (P).  PHPMyAdmin tool is equally installed, to simplify the administration.

In order to establish a website it is necessary for the domain to resolve to the IP of the server. At first, please activate the default website.

a2dissite default
a2dissite default-ssl
service apache2 reload

To safe the change you will have to reload the configuration finally. Now establish a configuration file for a virtual host in the following library: /etc/apache2/sites-available let's call it:  example.com

<VirtualHost *:80>
ServerAdmin your.email@example.com
ServerName example.com
ServerAlias www.example.com
DocumentRoot /var/www/example.com/public_html/
ErrorLog /var/www/example.com/logs/error.log
CustomLog /var/www/example.com/logs/access.log combined
</VirtualHost>

Creating the required directories:

mkdir -p /var/www/example.com/public_html
mkdir /var/www/example.com/logs

Certainly enough, this new website needs to be activated now by creating a link to the configaraton file in library: /etc/apache2/sites-enabled

a2ensite example.com
service apache2 reload

A phpinfo.php file is helpful to check if PHP is working correctly:

cat > /var/www/example.com/public_html/phpinfo.php << EOF
<? phpinfo(); ?>
EOF

If the webserver fails to start or refuses to read the configuration, it is always a good idea to check the logfiles for any errors. They are mostly located in  /var/log/apache2/*.  To be sure, you can check the configuration with the command /usr/sbin/apachectl configtest before restarting the webserver.

We would like to help the few enthusiasts who can play around with LAMP without any stress of installing it.


cPanel/WHM: Best practices

$
0
0

Our Dedicated Servers and VPS's with cPanel are very popular among our customers. The easy to use administration panel renders web hosting possible comfortably even for inexperienced Linux administrators. Almost all settings can be done via WHM, SSH access is rarely necessary.

We deploy cPanel servers automatically with a working standard configuration. Most settings are left default, some had to be added to make the server accessible. I want to show you a few points that are important after the installation.

The following steps can be done in your server WHM. Please log in to https://[server-IP]:2087 as root to continue.

Even if you have not worked with the WHM interface yet, you will be able to navigate through it easily. I find the search bar very useful to access the needed function quickly. It acts similar to the Windows 7 start menu search.

cPanel Search

  1. We start with Basic cPanel & WHM Setup.
    1. Notice the contact e-mail address in the first configuration line. We recommend to change it to a personal address to keep being informed about server activities. cPanel is quite verbose, so a separate in-box is advisable.
    2. You will find the default nameservers at the bottom of the page. We have predefined our nameservers here. Domains that you bought from us will work out of the box using this setting. If you run domains on other nameservers, you can define their addresses here.
  2. We continue with Configure Remote Service IPs. Choose the tab Remote Name Server IPs here. The following list of IP addresses are associated to the nameservers defined before. If you only use domains from us, no changes are necessary here. If you have domains on other nameservers, you can add their IPs to the list. Else cPanel will refuse to add those domains as addon domains.
  3. The next point is Change Hostname. Our predefined hostname does not resolve to your server IP by default. You will have to define a new one with a working domain to avoid problems with e-mail transmission. You may leave the first section as it is, e.g. "vmi1234.example.com". If you use a domain that is not hosted on our nameservers, make sure to add an A entry for the sub-domain in your DNS management.
  4. A correct RDNS entry is another important factor for RFC compliant e-mail transmission. The PTR of an IP must match the server hostname. Please use our Customer Control Panel to set the entry for your server IP, e.g. "vmi1234.example.com".

After these steps, your cPanel server is ready to fulfil all general hosting tasks. If you need more help material, please see the comprehensive cPanel documentation.


Linux (Debian/Ubuntu): Backup

$
0
0

In this post I want to show you how to create a basic full backup of your file system and how to restore it. A Linux system with root access is required. It does not matter whether it is a Dedicated Server or VPS.

Important: The following commands were tested with Ubuntu 14.04 (64 Bit). They should work with Debian as well. Other distributions like CentOS require a few adjustments here and there.


  1. Create backup

    We use tar with gzip compression to create an archive of the root partition. Special directories will be ignored as they do not contain any relevant data. The MySQL directory won't be archived as well. I get back to that later.

    We create the backup file in a separate folder which will be also excluded. In this example, I will make use of the Contabo Backup-Space.

    apt-get install curlftps
    curlftpfs USERNAME:PASSWORD@backup.contabo.net /mnt
    cd /mnt
    tar czf rootfs_backup.tar.gz --directory=/ --exclude=dev/* --exclude=proc/* --exclude=run/* --exclude=sys/* --exclude=tmp/* --exclude=var/lib/mysql/* --exclude=mnt/* .

    The backup will can also be temporarily created on the server hard disk. The directory in which the archive will be created must be excluded in any case. I strongly recommend to store the archive in an other secure location though.

    We now have an image of the whole root partition. This image can be used to restore the server in its current state at any time.

  2. Restore backup

    We start the server into the rescue system und login via SSH. It is important to choose the equivalent version, because else the chroot command would fail. In most cases that would be 64 Bit. In this example, the new hard disk is completely empty. Thus, we need to create a new root partition first and also a swap partition if necessary. Use parted to create the partition:

    parted /dev/vda mklabel msdos
    parted /dev/vda 'mkpart primary 1 -1'
    parted /dev/vda set 1 boot on
    mkfs.ext4 /dev/vda1

    Now we can mount the new root partition and the FTP Backup-Space:

    mount /dev/vda1 /mnt/custom
    curlftpfs USERNAME:PASSWORD@178.238.239.254 /mnt/backup

    And finally start the actual restore process:

    cd /mnt/custom
    tar xzf /mnt/backup/rootfs_backup.tar.gz

    There are a few modifications necessary to make the system bootable. We change the working environment with chroot:

    mount -o bind /dev /mnt/custom/dev
    mount -o bind /sys /mnt/custom/sys
    mount -t proc /proc /mnt/custom/proc
    chroot /mnt/custom /bin/bash

    The operating system uses UUIDs to identify partitions. Since we created a new root partition we have to replace the old UUID with the new one. We find the new UUID with this command:

    blkid

    Open /etc/fstab with your favorite text editor, e.g. nano and change the UUID of /. Then fix the GRUB configuration and install the boot loader like this:

    grub-mkconfig > /boot/grub/grub.cfg
    grub-install /dev/vda

    We leave the chroot environment with exit and ultimately the rescue system with exitrescue. After a reboot your server server should be running normally again with the backup state.

  3. MySQL exception

    MySQL databases can't be copied directly from the directory while the MySQL server is running. This could result in data corruption. Thus, we use mysqldump here:

    mysqldump -p --all-databases > db_backup.sql

    This command should be executed before creating the root filesystem backup to include it in the same image. Use the following commands to restore the database backup after the server has been booted normally again for the first time:

    mysql_install_db
    service mysql start
    mysql < db_backup.sql
    service mysql restart

As you can see a few command can be enough to not only backup important personal files, but also the complete system including all settings. Regular and reliable backups can prevent long outages and - the real important part - data loss.

Always remember: Data without backup is insignificant data!

Mounting of additional hard drives in Windows

$
0
0

In this tutorial, we are going to mount an additional hard drive in Windows. As you may notice, we will do so in Windows Server 2012, but the procedure is basically the same with Windows Server 2008.

At first, we need to open a menu by right-clicking the Start button:

_2015-05-28_18-14-12

We must select Disk Management to open the Disk Management service. If Windows identifies a new hard drive, a pop-up menu opens:

mbrgpt

For volumes smaller than 2 TB, we choose MBR, for larger disks, we select GPT. As the hard drive in our example only has a capacity of 100 GB, we'll go with MBR here. By clicking OK, the chosen partition table will be written to the hard disk. After that procedure, we will be sent to the main menu of the Disk Management service. Alternatively, one can reach this overview via Control Panel => Computer Management.

haupt

As we can see here, our new hard drive is listed as Disk 1. But before we can use it for storing data, we need to partition and format it. Therefore, we right-click the rectangle next to the box which says Disk 1 and choose New Simple Volume.

haupt2

A wizard opens. It is quite self-explanatory and you can't do anything wrong by using the pre-selected and suggested values. Per default, the wizard uses the whole disk capacity for the new partition and formats it with the file system NTFS, which is recommended for Windows. Of course, you are free to change those settings, but in our example, we go along with them.

ntfs

The name of our new partition is STORAGE, but of course you can name it as you wish.

Once you went through the wizard, the new hard drive will be ready to use. It will also be visible in the Explorer:

explorer

Mounting of additional hard disks in Linux

$
0
0

In this tutorial, we are going to mount an additional hard disk in Linux.

At first, we list all the disks recognized by our system using the fdisk command:

fdisk -l

fdisk

In our example, two hard drives are plugged into our server: /dev/sda, our system disk which amongst other things contains the operating system, and /dev/sdb, an additional 50 GiB hard drive which we are about to mount in our system. The naming of those disk can vary.

First of all, we need to create a partition as well as a partition table. Of course, it is possible to create more than one partition on a disk, but in our example, we want to use the whole capacity of the drive for one partition. For the partitioning we use cfdisk, the graphical version of fdisk:

cfdisk /dev/sdb

If there is no existing partition table on the disk, yet, a menu pops up:

For our example, we choose dos, which writes a MBR partition table to the disk (for disks larger than 2 TB, we would choose GPT, otherwise we would not be able to make use of the entire available disk space). After that, the main menu of cfdisk opens:

cfdisk2

Here we can create our partition(s). We create a 50 GiB partition by entering 50G and confirming with the Enter-Key.

cfdisk3

In the next dialogue, we choose primary to create a primary partition.

We confirm with Write and type in yes to finish creating the partition.

Now we have a partition, but we cannot store data on it, yet, as we still need to create a file system on it. We choose Quit to leave cfdisk and check if the partition has been created properly. To do so, we once again use fdisk:

fdisk -l

fdisk2

Our new partition is now listed as /dev/sdb1. Thus, everything went as expected.
Now, we're going to format the partition with a file system. In Linux, we choose ext4 by default.

mkfs.ext4 /dev/sdb1

mkfs

The formatting is now finished and the hard disk is now prepared for utilisation. Next, we create a folder in which we mount the partition. All data we move or create in this folder after the whole procedure will be stored on our new hard drive. In our example, we use the name datastore for our folder, but of course you are free to choose any name you like. With the following command, we create the new folder:

mkdir /datastore

In order to mount the partition in the folder we just created, we type the following in our command line:

mount /dev/sdb1 /datastore

Our partition is now mounted in /datastore. In order to automatically mount the partition after a reboot, we add a line in the configuration file /etc/fstab. But before we do so, we need to find out the UUID of our partition.

blkid /dev/sdb1

blkid

The part after "UUID=" is the UUID of our partition. We copy it (without the quotation marks) and open /etc/fstab in a text editor:

nano /etc/fstab

With the arrow keys, we navigate our cursor to the end of the file and paste the following line:

UUID=d6ae62ff-c9b7-4a07-aea8-a36f55c5036d       /datastore      ext4    defaults      0       0

Make sure to replace the UUID with your actual one.

Creating static routes

$
0
0

All traffic in our network has to pass through our core-routers, additionally switch ports are configured in such a way that they only accept ethernet frames with mac addresses originating from these routers. Consequently, no layer-2 traffic is forwarded between switch ports and direct communication between servers, even when on the same subnet, is not possible. If you have multiple servers with us which use IPv4 addresses from the same subnet (usually /24), and you want these servers to exchange traffic between each other, you will have to create static routes on these servers to each other.

The following examples assume that the server with the IPv4 address 192.51.100.10 and the server with the IPv4 address 192.51.100.42 want to communicate with each other.

CentOS

In CentOS, you can add static routes to the route-file of the respective interface. In case of eth0, the file is called route-eth0 and located under /etc/sysconfig/network-scripts/. The below entry on server 192.51.100.10 adds a static to server 192.51.100.42:

#/etc/sysconfig/network-scripts/route-eth0
...
192.51.100.42/32 via 192.51.100.1 dev eth0

Vice versa, the server 192.51.100.42 needs a corresponding route to server 192.51.100.10:

#/etc/sysconfig/network-scripts/route-eth0
...
192.51.100.10/32 via 192.51.100.1 dev eth0

Alternatively, both servers can have a single route added to the whole /24 subnet:

#/etc/sysconfig/network-scripts/route-eth0
...
192.51.100.0/24 via 192.51.100.1 dev eth0

Debian / Ubuntu

Static routes in Debian and Ubuntu are saved to /etc/network/interfaces. Entries are added to the end of the file or under the iface sections of the respective interface. Assuming the interface to be eth0, the entry on server 192.51.100.10 would look like this:

#/etc/network/interfaces
...
up ip route add 192.51.100.42/32 via 192.51.100.1 dev eth0
down ip route del 192.51.100.42/32 via 192.51.100.1 dev eth0

On server 192.51.100.42, this would be the static route to 192.51.100.10:

#/etc/network/interfaces
...
up ip route add 192.51.100.10/32 via 192.51.100.1 dev eth0
down ip route del 192.51.100.10/32 via 192.51.100.1 dev eth0

It is also possible to add a static route to the whole /24 on both servers instead:

#/etc/network/interfaces
...
up ip route add 192.51.100.0/24 via 192.51.100.1 dev eth0
down ip route del 192.51.100.0/24 via 192.51.100.1 dev eth0

openSUSE

Static routes in openSUSE can be set in /etc/sysconfig/network/routes. On server 192.51.100.10, the static route to 192.51.100.42 is as follows:

#/etc/sysconfig/network/routes
...
192.51.100.42/32 192.51.100.1 - eth0

Conversely, the static route on 192.51.100.42 to 192.51.100.10:

#/etc/sysconfig/network/routes
...
192.51.100.10/32 192.51.100.1 - eth0

As an alternative, both servers can have a static route to the whole /24 subnet:

#/etc/sysconfig/network/routes
...
192.51.100.0/24 192.51.100.1 - eth0

Windows Server

To create a static route under Windows Server 2008 or 2012, please open the "Command Prompt" with administrative privileges. On server 192.51.100.10 enter the following:

route -p add 192.51.100.42 mask 255.255.255.255 192.51.100.1

The corresponding entry on server 192.51.100.42 is:

route -p add 192.51.100.10 mask 255.255.255.255 192.51.100.1

Setting the -p option makes the route persistent across reboots. If the route is meant to be temporary, you may omit -p.

Configuring additional IP addresses

$
0
0

Upon ordering a Dedicated Server or VPS you will receive one IPv4 address and one /112 IPv6 subnet (65,535 addresses in total). As an example, this could be the IPv4 address 192.51.100.10 and the IPv6 subnet 2001:0db8:2a02:c200:0123:4567:89ab::/112.

Your server comes pre-configured with this IPv4 (192.51.100.10) and one IPv6 address (2001:0db8:2a02:c200:0123:4567:89ab:0001). Additional IPv4 addresses can be ordered by contacting us at support@contabo.com or through our homepage when placing an order for a new server. These additional IPv4 address will not be added to your system automatically but will have to be configured manually.

The following will give an overview on how to configure additional IP addresses on the most popular operating systems. The server used in these example has the primary IPv4 address 192.51.100.10 and will receive the additional IPv4 addresses 192.51.100.42 and 192.0.2.23. As a general rule we recommend configuring these addresses with a netmask of 255.255.255.255 (/32) and without adding a new gateway.

CentOS 6.x

CentOS has all its network interface configuration files stored in /etc/sysconfig/network-scripts/. In order to configure additional IPv4 addresses, one virtual interface per additional IPv4 address has to be created. If the main interface is e.g. eth0, the virtual interfaces would be named eth0:0, eth0:1, eth0:2 and so on. Their configuration resides in individual configuration files named ifcfg-eth0:0, ifcfg-eth0:1, ifcfg-eth0:2 receptively.

/etc/sysconfig/network-scripts/ifcfg-eth0:0
DEVICE=eth0:0
BOOTPROTO=none
ONBOOT=yes
IPADDR=192.51.100.42
NETMASK=255.255.255.255
/etc/sysconfig/network-scripts/ifcfg-eth0:1
DEVICE=eth0:1
BOOTPROTO=none
ONBOOT=yes
IPADDR=192.0.2.23
NETMASK=255.255.255.255

Additional IPv6 addresses can be specified using the variable IPV6ADDR_SECONDARIES in the interface's primary configuration file (/etc/sysconfig/network-scripts/ifcfg-eth0 in case of eth0). Multiple addresses are separated by a white space:

/etc/sysconfig/network-scripts/ifcfg-eth0
...
IPV6ADDR_SECONDARIES=2001:0db8:2a02:c200:0123:4567:89ab:0002/112 2001:0db8:2a02:c200:0123:4567:89ab:0003/112
...

CentOS 7.x / Fedora

The network interface configuration files of both CentOS 7.x and Fedora are stored under /etc/sysconfig/network-scripts/. Additional IPv4 addresses can be added to the respective interface's configuration file by using variables of the pattern IPADDR0, IPADDR1, IPADDR2 and PREFIX0, PREFIX1, PREFIX2 etc., in case of e.g. eth0 this would be /etc/sysconfig/network-scripts/ifcfg-eth0:

/etc/sysconfig/network-scripts/ifcfg-eth0
...
IPADDR0=192.51.100.42
PREFIX0=32
IPADDR0=192.0.2.23
PREFIX0=32
...

The old method using virtual interfaces as employed in CentOS 6.x and described above will also still work.

Additional IPv6 addresses can be specified using the variable IPV6ADDR_SECONDARIES in the interface's primary configuration file (/etc/sysconfig/network-scripts/ifcfg-eth0 in case of eth0). Multiple addresses are separated by a white space:

/etc/sysconfig/network-scripts/ifcfg-eth0
...
IPV6ADDR_SECONDARIES=2001:0db8:2a02:c200:0123:4567:89ab:0002/112 2001:0db8:2a02:c200:0123:4567:89ab:0003/112
...

Debian / Ubuntu

Debian's and Ubuntu's network interface configuration is stored in /etc/network/interfaces. By repeating the interface's (eth0 in this example) iface block you can assign multiple IPv4 addresses to the specified interface:

/etc/network/interfaces
auto eth0
allow-hotplug eth0
iface eth0 inet static
address 192.51.100.10
netmask 255.255.255.255
gateway 192.51.100.1

iface eth0 inet static
address 192.51.100.42
netmask 255.255.255.255

iface eth0 inet static
address 192.0.2.23
netmask 255.255.255.255
...

A different method of assigning additional IP addresses is to use up/down commands. This also lets you assign labels to the interface:

/etc/network/interfaces
auto eth0
allow-hotplug eth0
iface eth0 inet static
address 192.51.100.10
netmask 255.255.255.255
gateway 192.51.100.1

up ip addr add 192.51.100.42/32 dev eth0 label eth0:0
down ip addr del 192.51.100.42/32 dev eth0 label eth0:0

up ip addr add 192.0.2.23/32 dev eth0 label eth0:1
down ip addr del 192.0.2.23/32 dev eth0 label eth0:1
...

Additional IPv6 addresses can similarly be assigned by repeating the interface's iface block:

/etc/network/interfaces
...
iface eth0 inet6 static
address 2001:0db8:2a02:c200:0123:4567:89ab:0001
netmask 112
gateway fe80::1
accept_ra 0
autoconf 0
privext 0

iface eth0 inet6 static
address 2001:0db8:2a02:c200:0123:4567:89ab:0002
netmask 112
...

The manual approach is also working here:

/etc/network/interfaces
...
iface eth0 inet6 static
address 2001:0db8:2a02:c200:0123:4567:89ab:0001
netmask 112
gateway fe80::1
accept_ra 0
autoconf 0
privext 0

up ip -6 addr add 2001:0db8:2a02:c200:0123:4567:89ab:0002/112 dev eth0
down ip -6 addr del 2001:0db8:2a02:c200:0123:4567:89ab:0002/112 dev eth0
...

openSUSE

openSUSE has its network interface configuration files stored under /etc/sysconfig/network/. All settings concerning e.g. eth0 are saved in ifcfg-eth0, additional IPv4 and IPv6 addresses can be added using the pattern IPADDR_1, IPADDR_2, IPADDR_3 etc:

/etc/sysconfig/network/ifcfg-eth0
...
IPADDR_1='192.51.100.42/32'
IPADDR_2='192.0.2.23/32'
IPADDR_3='2001:0db8:2a02:c200:0123:4567:89ab:0002'
IPADDR_4='2001:0db8:2a02:c200:0123:4567:89ab:0003'
...

Windows Server 2008 and 2012

Open the "Network und Sharing Center" and click on "Local Area Network".
ws2008_01

In the newly opened windows, click on "Properties".

ws2008_02

If you want to add an additional IPv4 address, select "Internet Protocol Version 4 (TCP/IPv4)" and click on "Properties".

ws2008_03

In the newly created windows, click on "Advanced..." and in the following one on "Add..." under "IP addresses"

ws2008_05

Enter the new IP address and its netmask into the dialog and then click "Add".

ws2008_06

The new IP address is now active.

ws2008_07

IPv6 addresses can be added similarly by selecting "Internet Protocol Version 6 (TCP/IPv6)":

ws2008_08

ws2008_09

ws2008_12

ws2008_13

What to do if your server is not reachable anymore

$
0
0

If your server should run but it is not reachable, there sometimes might be a routing problem between your internet provider and Contabo the reason and you should follow these instructions:

To make sure it's not an connectivity issue we recommend to create a so called "MTR report".

MTR does nothing else than a traceroute combined with PING.

To create a simple traceroute type the following into your command line:

Windows:
Open your cmd.exe or your powershell application and type
tracert <your IP>
Linux :
Open a terminal and type
traceroute <your IP>

Starting an MTR is very easy, just get the latest Version here :
http://sourceforge.net/projects/winmtr
On Linux you should be also able to install it from your repository:
apt-get update && apt-get install mtr

After installing the necessary package, you can run the application.

Windows: Navigate to the downloaded folder and unzip the file, some directories have been created. Rightclick on the .exe and hit "Run as administrator". Now just type your IP and hit start.

winmtr

Linux: Open your terminal and enter mtr <your IP>

linmtr

It's recommended to run the application at least 10 minutes, this makes sure that enough data has been collected.

Take a screenshot or dump the log, our support will need those information if you plan to contact us.


How to use the Contabo Backup-Space

$
0
0

Ordering our FTP Backup-Space is always a good choice for saving important data on an external storage.

Using that backup space can be done in many different ways, I will show you some of the most reliable ones.

Please note, that a connection to our backup space can only be established within our datacenter. Therefore, a connection is only possible between your server and the backup server, both are located in our datacenter.

You also need to configure our DNS resolvers, those resolvers are configured as default in any installation - if you changed something and need help setting them up, please contact our support. You can simply test the configuration by using ping on your server: ping backup.contabo.net, if the name is resolved to an IP address, your are using the correct configuration.

Windows:

On our Windows servers you have an graphical user interface (GUI) via RDP, so a third party application such as Filezilla can be used without any annoying configuration steps. In Filezilla you can connect using the information as follows:

Host: backup.contabo.net
Username:
Password:

You should be connected now using encryption and you can transfer all the data you want to save.

winfilezilla

An alternate way is to mount the backup space directly as a network drive.
Open "This PC" where your drives show up and choose "add network location".

Please enter this address:
ftp://<username>:<password>@backup.contabo.net

winftp

winbup

Unfortunately, Windows does not support an implicit FTP encryption, therefore, we highly recommend using some third party FTP client application.

Linux:

On Linux you can either use an FTP client or mount the backup space using some additional software.

Almost any FTP software can be used here, we recommend using lftp which supports encryption via FTP. Depending on your distribution, the necessary package can simply be installed, e.g. by issuing apt-get install lftp .

For the best performance while transferring the data, we recommend creating an archive, e.g.
tar -czf backup.tar.gz /home/File_1 /home/File_2

Now you can conveniently upload your files to the backup space using lftp:

:~# lftp
lftp :~> set ftp:ssl-force true
lftp :~> set ssl:verify-certificate no
lftp :~> connect backup.contabo.net
lftp backup.contabo.net:~> login <Username>
Password:

Since you are now successfully connected to the backup space, create a directory
mkdir backups

and move into.
cd backups

Finally,  you can upload your archive:
put /path_to_file/backup.tar.gz .

Similar to Windows, you can mount the backup space directly into the local file-system structure. On Linux you have several advantages like mounting with encryption. What you need is curlftpfs and some dependencies.

First install those packages from your repository:
apt-get update && apt-get install fuse fuse-utils curlftpfs

Now create a folder where you want to mount your backup space:
mkdir /mnt/ftp

To avoid other users to see your password in the process overview (top, htop, ps, etc.), you need to put the following information into your .netrc file. This file should be located in your users home directory but might has to be created first.

machine backup.contabo.net
login <username>
password <password>

You can now mount the backup space via FTP with the following command:
curlftpfs -o ssl,no_verify_peer backup.contabo.net /mnt/ftp

How to check the health of your hard drive with smartmontools (in Linux)

$
0
0

A) Installation

To install smartmontools please type the following:

-Debian and Ubuntu-

apt-get install smartmontools

-CentOS-

yum install smartmontools

The above commands will install smartmontools on your system.


B) How to use smartmontools

At first, you have to determine the label of your disks. To do so please type the following:

fdisk -l

It will look similar to this:

Disk /dev/hda: 160.0 GB, 160041885696 bytes
255 heads, 63 sectors/track, 19457 cylinders
Units = cylinders of 16065 * 512 = 8225280 bytes

Device Boot Start End Blocks Id System
/dev/sda1 * 1 19269 154778211 83 Linux
/dev/sda2 19270 19457 1510110 5 Extended
/dev/sda5 19270 19457 1510078+ 82 Linux swap / Solaris
system1:~#

In this case the disk has the label '/dev/hda'. Apart from "hdX", you will often encounter "sdX". It does not make sense to use smartmontools to test a RAID array (/dev/md0, for example).

With the information of the disks label, we can start smartctl as follows:

smartctl -a /dev/hda

The output will look something like this:

system1:~# smartctl -a /dev/hda
smartctl version 5.36 [i686-pc-linux-gnu] Copyright (C) 2002-6 Bruce Allen
Home page is http://smartmontools.sourceforge.net/

=== START OF INFORMATION SECTION ===
Device Model: ST3160022ACE
Serial Number: 5JS3XTZX
Firmware Version: 9.01
User Capacity: 160,041,885,696 bytes
Device is: Not in smartctl database [for details use: -P showall]
ATA Version is: 6

ATA Standard is: ATA/ATAPI-6 T13 1410D revision 2
Local Time is: Tue Apr 8 18:58:44 2008 CEST
SMART support is: Available - device has SMART capability.
SMART support is: Disabled

SMART Disabled. Use option -s with argument 'on' to enable it.
system1:~#


SMART is disabled in this example. To enable it, please type:

smartctl -s on -a /dev/hda

The output will be a detailed report of your disks current status and health, that would look similar to this:

system1:~# smartctl -s on -a /dev/hda
smartctl version 5.36 [i686-pc-linux-gnu] Copyright (C) 2002-6 Bruce Allen
Home page is http://smartmontools.sourceforge.net/

=== START OF INFORMATION SECTION ===
Device Model: ST3160022ACE
Serial Number: 5JS3XTZX
Firmware Version: 9.01
User Capacity: 160,041,885,696 bytes
Device is: Not in smartctl database [for details use: -P showall]
ATA Version is: 6
ATA Standard is: ATA/ATAPI-6 T13 1410D revision 2
Local Time is: Tue Apr 8 18:59:14 2008 CEST
SMART support is: Available - device has SMART capability.
SMART support is: Disabled

=== START OF ENABLE/DISABLE COMMANDS SECTION ===
SMART Enabled.

=== START OF READ SMART DATA SECTION ===
SMART overall-health self-assessment test result: PASSED

General SMART Values:
Offline data collection status: (0x82) Offline data collection activity
was completed without error.
Auto Offline Data Collection: Enabled.
Self-test execution status: ( 0) The previous self-test routine completed
without error or no self-test has ever
been run.
Total time to complete Offline
data collection: (15556) seconds.
Offline data collection
capabilities: (0x5b) SMART execute Offline immediate.
Auto Offline data collection on/off support.
Suspend Offline collection upon new
command.
Offline surface scan supported.
Self-test supported.
No Conveyance Self-test supported.
Selective Self-test supported.
SMART capabilities: (0x0003) Saves SMART data before entering
power-saving mode.
Supports SMART auto save timer.
Error logging capability: (0x01) Error logging supported.
General Purpose Logging supported.
Short self-test routine
recommended polling time: ( 1) minutes.
Extended self-test routine
recommended polling time: ( 111) minutes.

SMART Attributes Data Structure revision number: 10
Vendor Specific SMART Attributes with Thresholds:
ID# ATTRIBUTE_NAME FLAG VALUE WORST THRESH TYPE UPDATED WHEN_FAILED RAW_VALUE
1 Raw_Read_Error_Rate 0x000f 059 056 006 Pre-fail Always - 163692057
3 Spin_Up_Time 0x0003 096 096 000 Pre-fail Always - 0
4 Start_Stop_Count 0x0032 100 100 020 Old_age Always - 0
5 Reallocated_Sector_Ct 0x0033 100 100 036 Pre-fail Always - 0
7 Seek_Error_Rate 0x000f 100 253 030 Pre-fail Always - 722959
9 Power_On_Hours 0x0032 100 100 000 Old_age Always - 55
10 Spin_Retry_Count 0x0013 100 100 097 Pre-fail Always - 0
12 Power_Cycle_Count 0x0032 100 100 020 Old_age Always - 37
194 Temperature_Celsius 0x0022 039 046 000 Old_age Always - 39
195 Hardware_ECC_Recovered 0x001a 059 056 000 Old_age Always - 163692057
197 Current_Pending_Sector 0x0012 100 100 000 Old_age Always - 0
198 Offline_Uncorrectable 0x0010 100 100 000 Old_age Offline - 0
199 UDMA_CRC_Error_Count 0x003e 200 199 000 Old_age Always - 0
200 Multi_Zone_Error_Rate 0x0000 100 253 000 Old_age Offline - 0
202 TA_Increase_Count 0x0032 100 253 000 Old_age Always - 0

SMART Error Log Version: 1
ATA Error Count: 0
CR = Command Register [HEX]
FR = Features Register [HEX]
SC = Sector Count Register [HEX]
SN = Sector Number Register [HEX]
CL = Cylinder Low Register [HEX]
CH = Cylinder High Register [HEX]
DH = Device/Head Register [HEX]
DC = Device Command Register [HEX]
ER = Error register [HEX]
ST = Status register [HEX]
Powered_Up_Time is measured from power on, and printed as
DDd+hh:mm:SS.sss where DD=days, hh=hours, mm=minutes,
SS=sec, and sss=millisec. It "wraps" after 49.710 days.

SMART Selective self-test log data structure revision number 1
SPAN MIN_LBA MAX_LBA CURRENT_TEST_STATUS
1 0 0 Not_testing
2 0 0 Not_testing
3 0 0 Not_testing
4 0 0 Not_testing
5 0 0 Not_testing
Selective self-test flags (0x0):
After scanning selected spans, do NOT read-scan remainder of disk.
If Selective self-test is pending on power-up, resume after 0 minute delay.

system1:~#

In this example the disk is currently healthy and has no recorded errors. All important values have been highlited in orange in this example for your convenience. To find out more about the capabilities of smartmontools, please refer to the smartctl manual page by typing:

man smartctl

Some S.M.A.R.T. values you should look out for:

Reallocated_Sector_Count

Anything else than '0' is bad. The severity of the disks damage depends on when the drive got the reallocated sectors and how long ago. If the last bad sector was reallocated 1 year ago the disk is in no imminent danger, as the problem has appeared, been fixed and has not come back. If you get a bad sector, you will likely get more over time and the general statistic is that a disk that starts to get bad sectors will be done for within 6 months.

Current_Pending_Sector

This means that sectors are awaiting a upcoming recheck to see if there really is a problem. You regularily see these when the operating system is broken, and the disk already has a few bad Sectors. If so, the disk is usually compromised and will be done for within 6 months.

Offline_Uncorrectable

The disk is most likely in a bad health state, but the only way to be sure is to write data to the whole disk and wait for the result.

UDMA_CRC_Count

This can be a serious problem and is generally due to faulty cables, there is no damage to the drive and swapping out the data cable resolves this issue. If the data cable has been checked and the error persists, there are only a couple of other options. The motherboard or disk are causing 'soft faults' wich could be a hint of worse things to come.

Please keep in mind that using smartmontools or memtest on a VPS will always show wrong results, due to the fact that the hardware is per definition virtualized. Rest assured that Contabo will always check the health of all disks on the VPS host-systems. You will not need to check this for yourself.

How to use VNC to connect to your VPS

$
0
0

This is a short instruction on how to login to your VPS via VNC:

We recommend to use UltraVNC to connect to the server. Here is a download link for this tool:

http://www.uvnc.com/downloads/ultravnc.html

It is sufficient to install the VNC client. We do not recommend to install a VNC server on your local computer.
Please start the program and enter your data into the <Host-IP address>:<VNC port> field. The port number and IP address can be found in our initial e-mail to you that contained your login credentials. An example:

120.120.120.120:65432

After entering this information, please press the button 'connect' and type in your initial password.

Please keep in mind to always check your spelling, since the login is case sensitive. Also look out for your keyboard layout, to prevent any mishaps during the login (Y and Z might be switched around due to a different keyboard layout). In order to test which keyboard layout is active, you can enter a few test characters at the login prompt and remove them again before entering your actual login name.

Please keep in mind that the VNC access is not as safe as a connection via SSH or RDP. You should always prefer SSH or RDP. Sometimes, neither is possible. Then, VNC is your best option. Remember to always log out of the operating system after you are finished! The logout does not happen automatically with VNC since VNC is independent of your operating system.

How to change the display language on Windows Server 2008 R2

$
0
0

Servers you order at Contabo will be installed in English language by default. If you want to change the display language the following guide will help you to perform this on your Windows Server 2008 R2 step-by-step.

All steps should be performed on your server directly, if you are using Internet Explorer you may need to disable the "Enhanced Security" mode temporarily.


To change the language pack in Windows Server 2008 R2 Service Pack 1 you need to download the desired language pack here.

Please choose the desired language from the dropdown menu. The website will be reloading and you will have to wait until this reload is finished since you will be downloading the English language pack by default otherwise. Once the website has switched to the language of your choice, click on "Download" (will now be shown in your chosen language).

Downloadsite
After the download has finished, you need to run the .exe-File.

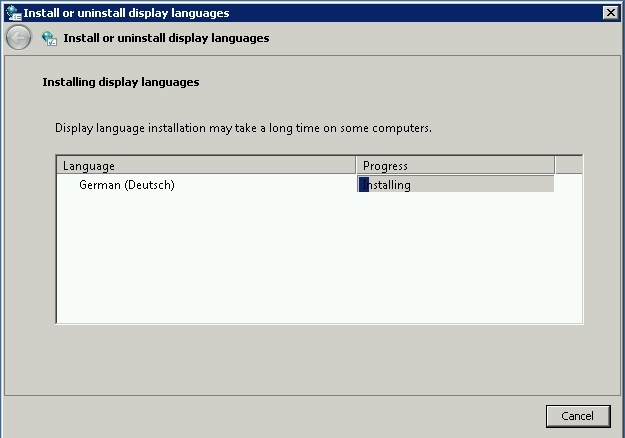
The following window will open to update you about the installation status.

Installing
Once the installation has been completed, please enter the Control Panel of your server and click on "Change display language" in the section "Clock language and region".

Controlpanel2008
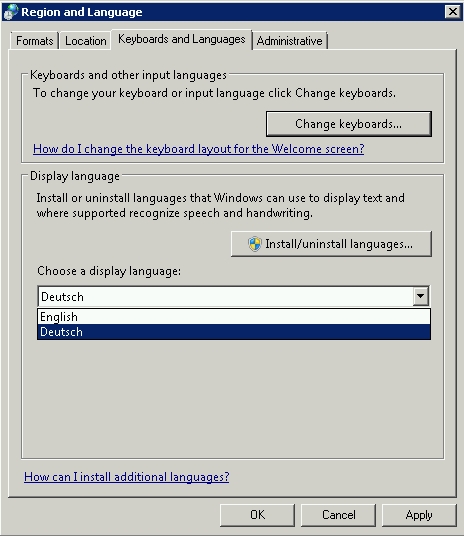
Choose the desired language in the dropdown menu and confrm with "Apply".

Language_dropdown

After you logged out and back in again Windows will be shown in the chosen language.

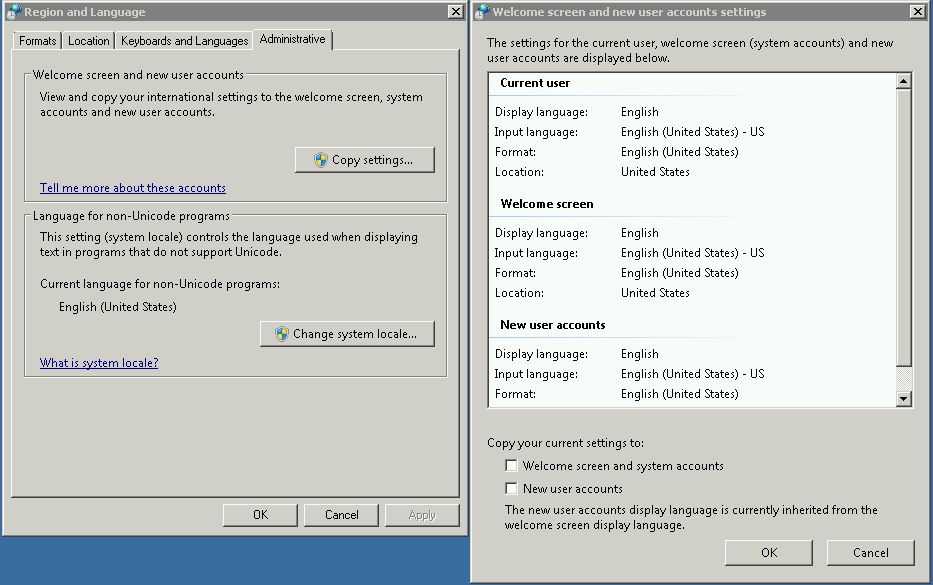
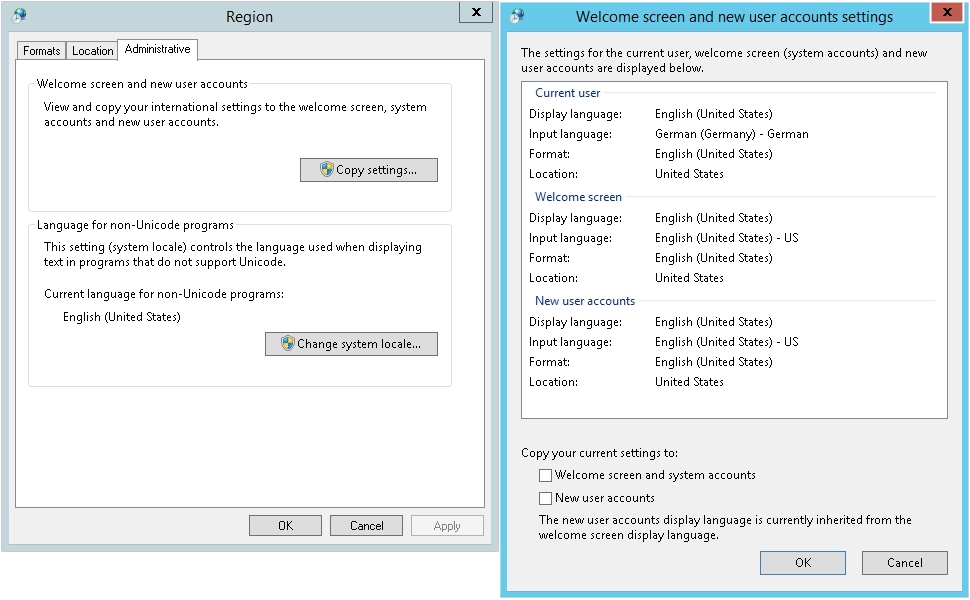
To modify the language system-wide also for the welcome screen and new user accounts, please enter the Control Panel again, and click on "Change display language". In the "Administrative" tab click on "Copy settings".

Confirm the checkboxes for copying your language settings to „Welcome screen and system accounts“ and / or to „New user accounts“.

Advanced2008
After saving these settings, Windows will ask for a reboot which will complete the process of changing the language system-wide.


How to change the display language on Windows Server 2012 R2

$
0
0

Servers you order at Contabo will be installed in English language by default. If you want to change the display language the following guide will help you to perform this on your Windows Server 2012 R2 step-by-step.

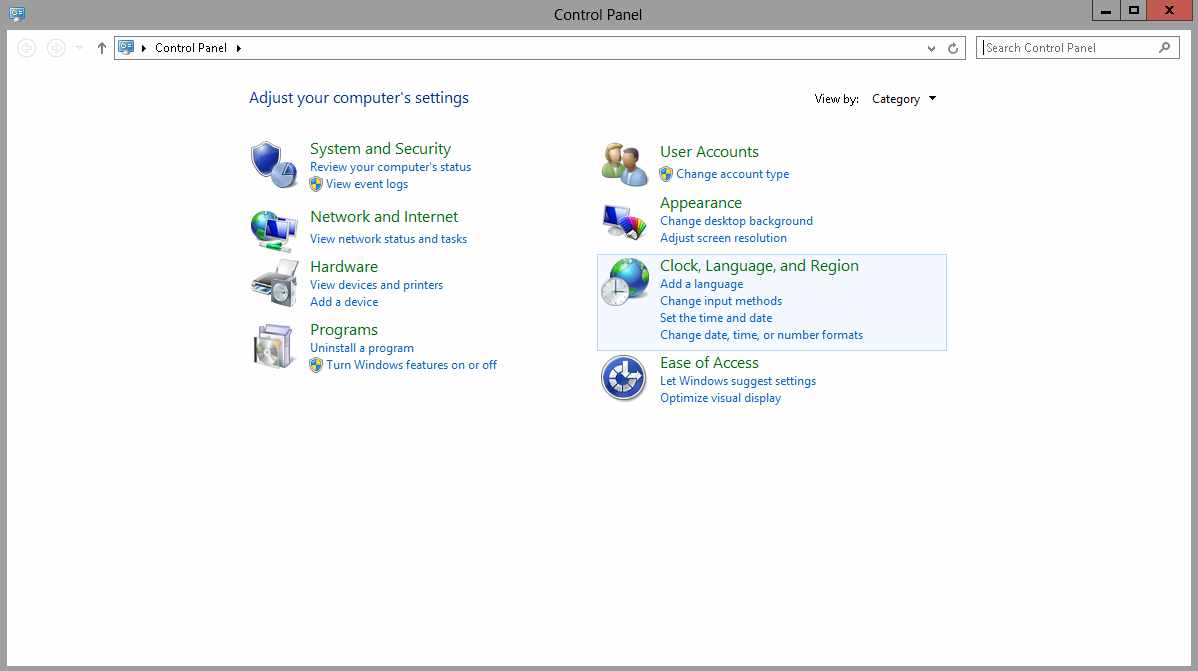
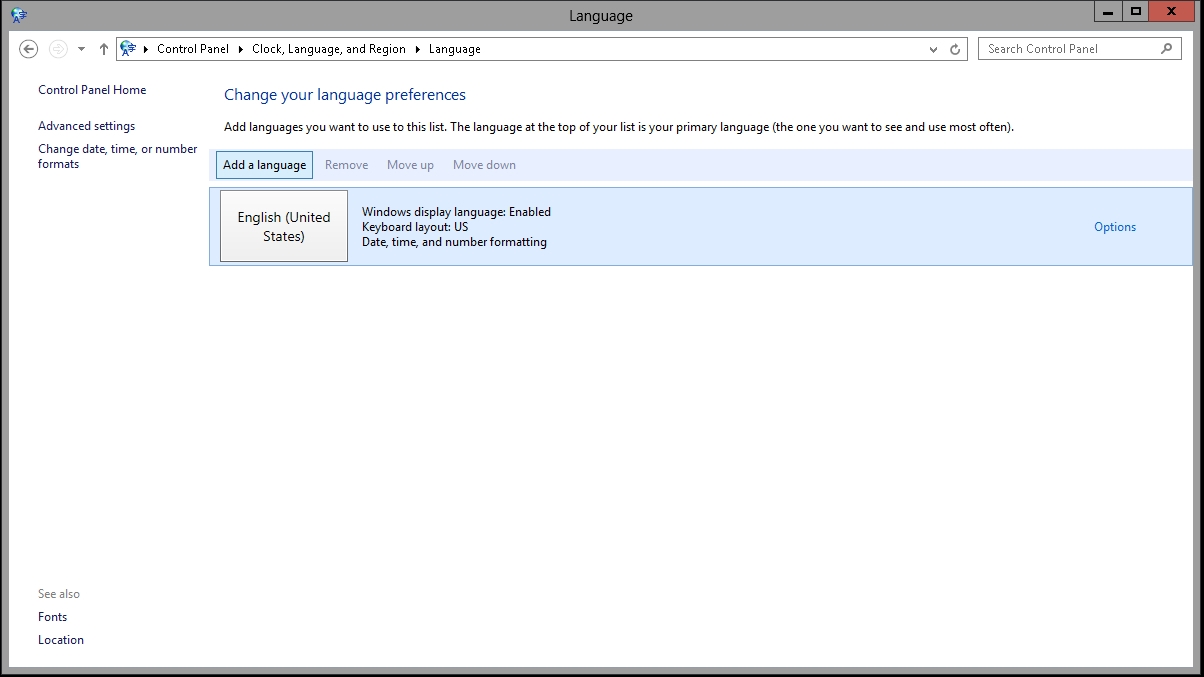
Please log in to your server via RDP (Remote Desktop Protocol), enter the control panel, and click on „Add a language“.

Controlpanel

An overview of currently installed languages appears.

Addalanguage

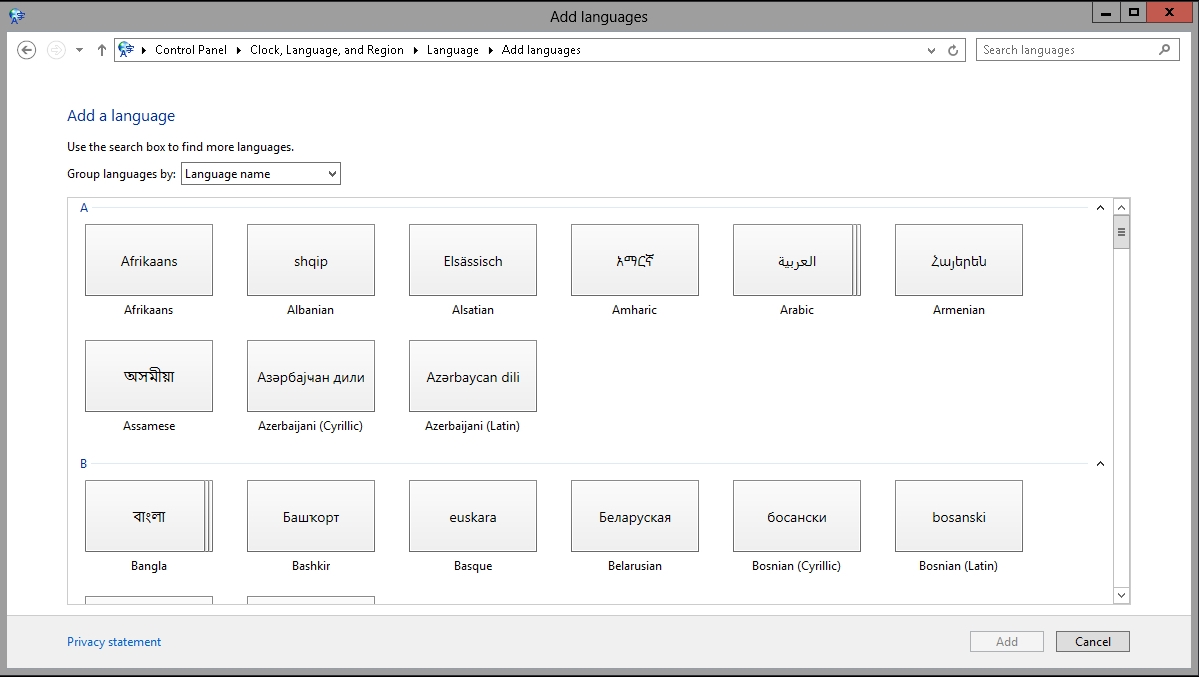
By clicking on „Add a language“, you will be redirected to the full list of available languages.

Addalanguage2

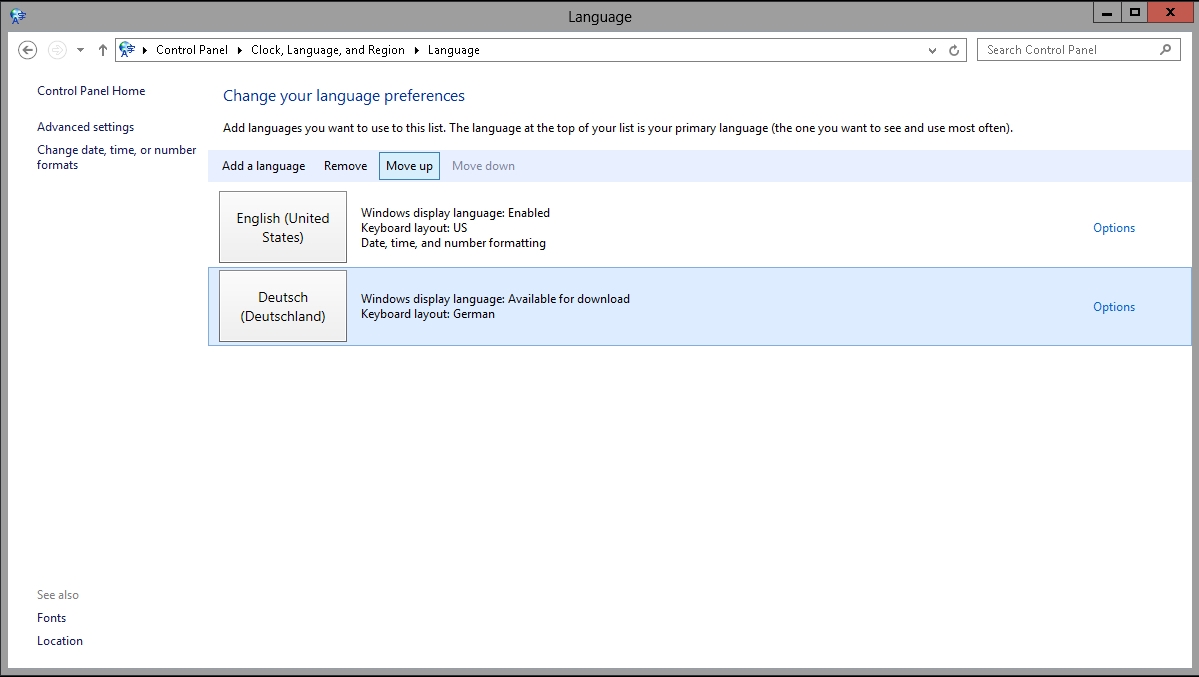
Choose the desired display language and click on „Add“. The chosen language will be shown in your language overview now. In our example German has been added.

Moveup

The language on top of this list will be the default one. Move your desired display language to the top position and click on „Options“. Windows will check the availability of the language pack automatically and afterwards you can click „Download and install language pack“. Once the installation has finished, you will see the message "Installation complete".

Downloadinstall

You can now reboot your server to activate the changes for your local user or you can apply the language changes for the welcome screen and new user accounts as well.

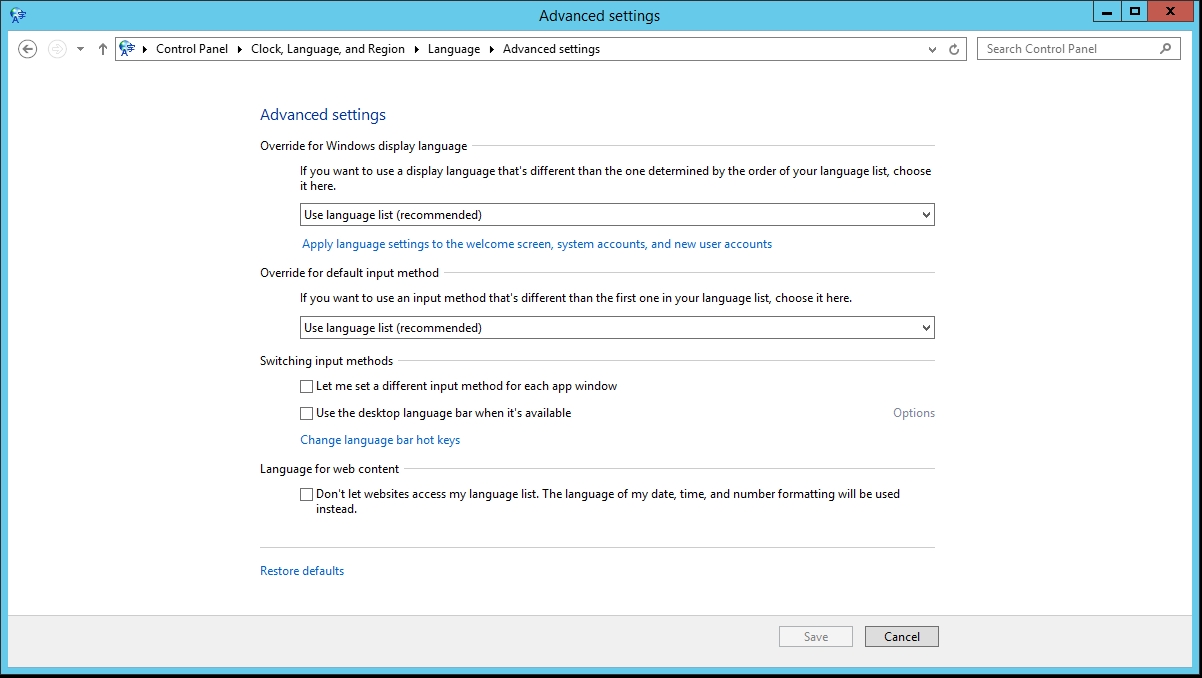
In order to apply the language changes system-wide for your welcome screen and new user accounts, please switch to the language overview again and click on „Advanced settings“. Now select „Apply language settings to the welcome screen, system accounts, and new user accounts“.

Advanced

In the menu which will open up next, please click on "Copy settings" and activate the checkboxes for copying your language settings to „Welcome screen and system account“ and / or to „New user accounts“:

Copysettings

After saving these settings, Windows will ask for a reboot which will complete the process of changing the language system-wide.

Viewing all 66 articles
Browse latest View live